Friday, February 25, 2011

Tortilla Pinwheels...

These are my favorite recipes for Tortilla Pinwheel appetizers. Not hard to make but real food that taste great! Hope you enjoy them and come up with your own favorite combinations of ingredients. Great way to add veggies to your kids diet..slip them in cheese and tortillas. You can use soft whole wheat tortillas in this recipe if you would like, but wrap them extra tight so they don't dry out. Whole Wheat tortillas will dry out faster than white flour tortillas. Post a comment and let me know what new pinwheels you create.


Tortilla Pinwheels Party Plate

Traditional Mexican Tortilla Pinwheels

8Lg. flour tortillas
8 oz. Light sour cream
8 oz. Light cream cheese
1 can chopped green chili
1/4 c. chopped onions
1/2 c. chopped black olives
1 c. 2% fat Mexican cheese, shredded
½ tsp. garlic salt or garlic powder


Bacon & Onion Pinwheels

8Lg. flour tortillas
8 oz. Light sour cream
8 oz. Light cream cheese
1/4 c. real bacon pieces
1/4 c. chopped onions
1/2 c. chopped red peppers or diced pimentos, well drained
1 c. 2% lowfat cheddar cheese, shredded
1 tsp. Green onion tops or dried chives

Buffalo Wing Pinwheels

8Lg flour tortillas
8 oz. Light sour cream
8 oz. Light cream cheese
1/2 c. blue cheese crumbles
1/4 c. chopped chicken (canned or cooked and shredded) great use for leftovers
1 c. 2% low fat mozzarella cheese, shredded
1-2 tsp favorite buffalo or hot sauce, taste to adjust the heat

For each recipe follow the same instructions:

Mix ingredients together & spread on tortillas
Roll tortillas & wrap in plastic wrap
Refrigerate overnight
Slice into 1/2 inch Arrange on platter
Keep covered in refrigerator until ready to serve
Serve with blue cheese dressing, ranch dressing or
Asian sauce is great to dip the Buffalo Wing Pinwheels

Monday, February 21, 2011

Southern girls & patience

Southern girls, like all women have special qualities that make us very lovable. Patience may not be one of those traits. I just told my husband what I am blogging today and he cracked up at the title. At this moment he is fixing my computer because I was a little anxious and kept trying to fix a problem & locked the whole thing up tighter than Dick's hat band! For those of you who are not blessed to be from the South, that's really tight. Poor guy must have kept a headache!

I really try to be patient, but am not always as successful as I need to be. We understand as women that not ever problem is within our power to solve. What we don't understand is our inability to make the person who has the power to solve that particular issue work at the speed we see fit. My biggest issue lately has been my website and it's lack of functionality. I tried to fire the website developer, but he kept reminding me that I married him 33 yrs ago & wouldn't leave anyway! So after much whining, complaining, begging & foot stomping, he fixed the website today.

Being a man, he is now reading all the stats of my website activity since it first went online. I am now losing my patience because so many people saw the website that reminded me of a cluttered hall closet! My Southern charm and patience has now reach the edge and the abyss is closer than ever.
Then he smiles at me and asks "Is this more like what you wanted?" Now the sweet Southern side comes back out and I say "yes baby..it's just what I wanted"...reminds me of the answers I've given on some sweaters he bought me for Christmas!!

When all is said and done, life is just too short to stress over things that can be changed. We have a new website up and running tonight. We are still speaking. Life is good!

Tuesday, February 15, 2011

Spicey Mama's Texas Chili

Years ago after leaving Texas I began the journey of creating chili perfection. When you live in the Chili capital of the world, you just assume that all chili is Texas style. In my mind's eye I see a steaming bowl of deep red, full flavored and spicy chili. Real Texas chili would not have beans or be any color other than a deeply robust red.

I have learned that people call lots of things chili and they all taste good. I will say I have had some great soups & stews that are made with the same spices but they aren't chili! I thought I had found the ultimate Texas chili at a chain restaurant that bears the Texas name...but after dipping my spoon in with excitement... I pulled out a bean! I will admit I do still order chili there because everything else is perfect and worth over looking the innocent bean.

This is my recipe for Texas Red Chili, if you add beans, please don't tell me! I might have to send out a Chili Intervention team to your house.

Spicey Mama’s Texas Red Chili

2 lbs of ground beef or turkey
1 large onion, chopped
1 small jalapeƱo, chopped
1 Anaheim pepper, chopped
1 Poblano pepper, chopped
1 T. cilantro, chopped
3 cloves of garlic, finely minced
1 tsp. Canola oil
1 large can (28oz.) crushed tomatoes
1 can (14.5oz.) tomato sauce, add a 2nd can if you like thinner chili
½ package Spicey Mama’s Texas Chili Seasoning or your favorite chili mix
Salt to taste


May use 1/2 of each pepper for a milder chili. When you cook or roast peppers they loose some of their heat. I like to roast mine in the oven before using, this gives a great deep flavorful taste to your chili.

Chop onions, peppers, cilantro & garlic
Heat oil in large heavy dutch oven over med-high heat.
Cook onions and peppers in oil for about 2 minutes, then add the garlic and cilantro and cook for about a minute stirring well to prevent garlic from over cooking.

Add meat to the pepper/onion mix and sprinkle the Spicey Mama’s over the meat.Continue to stir gently while meat is browning.

Add the crushed tomatoes and tomato sauce to meat/pepper mix and stir gently to prevent breaking up the meat to finely.

Taste and add salt or more seasoning. Will get spicier as it cooks but you can adjust the needed heat with more of the seasoning mix. If your using the Spicey Mama's Chili Seasoning from our website you may need to add salt, but if you use a grocery store product be sure & taste it before adding more.

Cook on low heat for about an hour, and then simmer very low until ready to serve.

Serve it in bowls with shredded sharp cheddar cheese, minced red onions and if you like them..add a few pickled jalapeƱos to the top!


Serves 4-6
Just double everything if you double the meat!

Visit my website @ http://www.newsouthernpantry.com if you would like to use the Spicey Mama's Texas Chili Seasoning in this recipe.
Spicey Mama's has no salt or sugar and it is free of gluten, MSG & preservatives. We use no fillers or artificial products in our all natural products.

Monday, February 7, 2011

Confessions of a Cast Iron Skillet Hoarder

Cast Iron skillets and cookware hold a fascination for me that at times is bordering on obsession. If I see a rusty old iron skillet at a garage sale I feel sad that someone is tossing it out. Do they not know what they are throwing away? We were at an estate sale once and all of the china, costume jewelry and linens were hugely overpriced. As I was walking through the sale I noticed a cardboard box under the table. Being the person I am, I had to see what was in that box. When I pulled away some old plastic bowls, I saw something black, greasy & rusty. My heart started to race because I knew this box contained a treasure that no one else cared about. I unearthed two iron skillets that had letters on the bottom and I could see a G, an I and a D. Being an iron skillet nut I knew these were Griswold skillets and from the look they were old. I ask the person running the sale how much she wanted for the skillets....she said "oh, I'll take a buck a piece for those old things" I had to turn around to keep my feelings to myself.


When I look at these skillets I always imagine the person who owned them. I see them cooking for a houseful of kids or maybe using them in a cafe. Maybe a chuck-wagon cook used them on the wagon trains crossing the plains. Maybe some young bride that knew no better gave them away for a new shiny aluminum skillet cause it was all the rage! I have been lucky enough in my life to have been taught to cook with iron skillets. And now I have inherited most of those from our grandmothers and great-grandmothers. I don't have to create fantasy meals in my mind of what these black jewels held, I experienced it first hand.

When our son was young he was in Cub Scouts and we continued our love of iron cooking with the Dutch Oven. There is something about building a fire outside and cooking a cobbler in an iron pot. It's not a fancy pastry but there is nothing like it in the world. Little boys are fascinated with cooking outside and that worked out fine for myself and my husband because we are too!

Many people don't want iron skillets or cookware because they are afraid that the food will stick, that they are hard to clean and that it will affect the taste of the food. I agree there are special ways to care for cast iron but once it's "seasoned" it's just the best thing in the world.
Highly acidic food such as tomatoes will cook darker, but if you cook them on lower heat they will be fine. I can scramble eggs that are light and fluffy in my skillets because they are treated and seasoned well. The longer you use an iron skillet the better it cooks. This is my treasured corn stick pan that belonged to my husbands grandmother. I just baked cornbread sticks, removed them and washed with it in warm soapy water. I place it in a 200 degree oven and let it dry then rub it lightly with a paper towel with a tiny bit of canola oil. Now it's ready for the next time I want to make corn sticks. It's that easy!

This website will help you with the care & cleaning of your iron cookware.www.lodgemfg.com
If you don't have any of these old iron skillets, go to an antique store and rescue one..or two..or three...! They will be so happy to be providing someone with delicious food again that they will serve you for a lifetime.

Wednesday, February 2, 2011

Pork Chili Verde Enchiladas

Living in Colorado in the fall taught me to long for New Mexico Hatch Chilies. If you have ever been lucky enough to smell these beautiful chilies roasting, you know what I mean! There is a festival in New Mexico to celebrate the Hatch Chili the first weekend in September. They roast these peppers in a huge metal drum with a handle that turns the chilies over an open flame. The perfume they give off while roasting will make your mouth water if you love Southwestern or Tex-Mex food.


Last Fall our local grocery store here in Nebraska sold Hatch chilies for 2 weeks. I went crazy buying, roasting, and freezing this peppers. All year long I used them to add to recipes and am beginning to run out! Yesterday I sat gazing at a boneless pork shoulder roast wondering what it would be at dinner time? My mind went blank until I started moving things around in the freezer. I found my Hatch chilies laying calmly under a bag of green beans and knew what we would have for dinner...Pork Chili Verde Enchiladas!

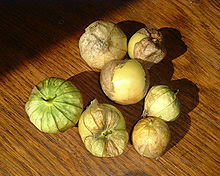
Let me say first that this is not a quick meal. If you are going to be home all day and want to make this recipe go for it. It's not a hard recipe,it just needs to cook several hours to develop the full flavor of the Chili Verde. I promise if you make it you will not be sorry! You can use an Anaheim Chili pepper if it's not Hatch Chili season. Some people use canned green chili's, you can but you won't get the same flavor. If you can't get the Anaheim green chili, use a Poblano & Jalapeno pepper. Tomatillos are the other ingredient that makes it a salsa verde or chili verde. These little jewels look like tiny green tomatoes with a brown paper on the outside.

To prepare your chili peppers for the verde you need to roast them on the grill or in the oven. Wash them well, pat dry and rub lightly with canola oil. Place them on a pan in a 375 degree oven or over a medium flame if using a gas grill. Roast peppers until skin blisters & is blackened. You will need to turn them several times to prevent burning. Take them out while hot and place them in a ziploc bag. Let them cool for 15 minutes or more,then while in the bag, rub the pepper to remove the charred skin. Transfer to a cutting board and remove stem. Cut peppers open and remove seeds seeds and any remaining charred skin. Chop in small pieces and set aside. Any pepper, tomatillo, onion, or garlic that is used in a salsa verde or chili verde needs to be roasted in this same way. This creates the roasted & mellow taste you want for this dish. Tomatillos do not have to have charred skins removed, but chop in 1/4 inch chunks after they are roasted, save juice that runs from them to add to chili.


Pork Chili Verde Enchiladas

Makes 12 Servings

2 lbs boneless lean Pork Shoulder-cut into 1/2 inch cubes & seasoned with
salt & pepper
3/4 cup flour,for dredging meat (can use gluten free flour)
1/2 tsp salt
2 tsp black pepper
2 tablespoon cumin
1 tsp Mexican oregano
1/4 cup canola oil
1 medium onion-peeled & roasted then diced into 1/4 inch pieces
2 large Hatch or Anaheim green chili's roasted & diced into 1/4 inch pieces
1 large jalapeno -roasted & diced into 1/4 inch pieces
4 tomatillos- husks removed &roasted then diced into 1/4 inch pieces
4 cloves roasted garlic, roasted then peeled & finely minced
4 cups chicken broth
12 corn tortillas
2 cups shredded cheese, Monterey jack or pepper jack, reserve part for topping the enchiladas
1/4 cup canola oil
1 tsp chopped fresh cilantro for garnish

After roasting and preparing peppers, onions, tomatillos, chop ingredients into 1/4 in pieces.
Finely mince the garlic, if roasted it will be soft & won't need mincing.
Mix 3/4 cup flour with 1/2 tsp salt, 1 tsp black pepper, 1 Tablespoon cumin,
1/2 tsp Mexican oregano. Salt & pepper pork and cut into 1/2 inch cubes and dredge in flour mixture.
In a large dutch oven, heat 1/4 cup canola oil to medium-high to sear meat. Shake off excessive flour mixture and place coated pork pieces in the dutch oven. Cook until light brown and then reduce heat to medium.
Add peppers, onions, tomatillos & garlic to meat and stir to combine. Then add remaining spices: 1 tsp black pepper, 1 Tablespoon cumin,& 1/2 tsp Mexican oregano. Stir spices into pepper/meat mixture and cook for 1-2 minutes. Add 4 cups of chicken broth and stir well. Cook uncovered on low heat for 1-2 hours, or until sauce is thick and pork is fork tender. Stir occasionally to prevent sticking. If it gets to thick add more chicken broth or liquid in small amounts desired consistency. Taste before serving and add salt if needed.

To make Enchiladas
Preheat oven to 400 degrees

In a 13x9 baking dish ladle small amount of the Chili Verde sauce on the bottom. In a small non-stick skillet, heat 1/4 cup canola oil to medium high heat. Oil should not be so hot it fries tortilla hard, just softens them enough to roll. Takes about 30 seconds on each side. When you remove it from the oil, blot with a paper towel. After warming all tortillas begin rolling the Enchilada's by placing grated cheese down the center of a tortilla. Roll Enchiladas cigar fashion and place seam side down in baking dish. Ladle Chili Verde over the top of Enchiladas. May not take all the chili to cover, but can be served on the side for those who want more. Top with remaining grated cheese. Place in preheated 400 degree oven & bake for 15 minutes. Garnish with cilantro & serve.

When I made this recipe last night, I cut the pork larger than 1/2 inch, closer to 1 inch. I thought the 1 inch was a little too large but my husband liked the bigger pieces. It's just a matter of preference. Hope you try this and enjoy it. If you do , post a comment and let me know what you think.